Restoration diary / 28-12-2005
28-12-2005 >> New rubber mounts on exhaust and finished the part between the turbo and the first damper (down pipe and middle section)
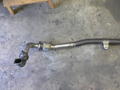
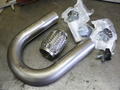 | p1030064.jpg (800 x 600) 28-12-2005 - New parts from EPS. It's a stainless pipe (2" diameter) bended for 180 degrees, 4 rubber mounts and a braided flexible 2x4" pipe to stop strain on the turbo. |
 | p1030065.jpg (600 x 800) 28-12-2005 - Close up of the flexible pipe. Contrary to what I expected, it's only works for bending forces. The pipe will not stretch and it takes a big force to compress it. No real problem though... |
 | p1030067.jpg (800 x 600) 28-12-2005 - The day after Christmas, it's snowing outside. |
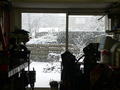
 | p1030077.jpg (800 x 600) 28-12-2005 - Snow, photo taken from within the Van... |
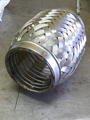
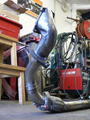
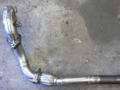
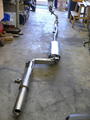 | p1030079.jpg (600 x 800) 28-12-2005 - The whole exhaust, from turbo-exit to end piece. |
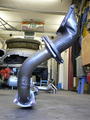
 | p1030081.jpg (600 x 800) 28-12-2005 - Another view of the whole exhaust. The beauty of the thing is in the first meter of piping, seen from the turbo-exit. It looks like it's just a bunch of pipes welded together where I didn't bother to weld 'm straight onto each other. Well... It's all supposed to be like this, otherwise it won't fit in the limited space under the Mini. It really is a beautiful piece of work, but you can only appreciate the real beauty of it when you see it mounted under the car. I will take photo's when it's mounted and hope those photo's will do the exhaust more justice... |
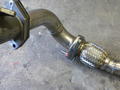
 | p1030082.jpg (600 x 800) 28-12-2005 - A view from the front. It starts with the turbo-exit (a bit modified), after that everything is custom made. |
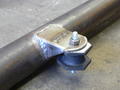
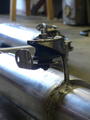 | p1030086.jpg (600 x 800) 28-12-2005 - The rear-most rubber mount. It bolts onto the sub frame. |
 | p1030087.jpg (800 x 600) 28-12-2005 - Same mount, seen from the front. |
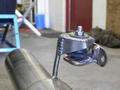
 | p1030089.jpg (600 x 800) 28-12-2005 - Second mount, counted from the rear. The rubber it bolts onto is mounted directly on the sub frame. |
 | p1030091.jpg (600 x 800) 28-12-2005 - Third mount, counted from the rear. Should be pretty strong and stiff. |
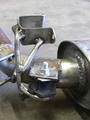
 | p1030092.jpg (800 x 600) 28-12-2005 - First mount, counted from the front. |
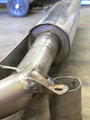
 | p1030093.jpg (600 x 800) 28-12-2005 - A view from the front. You can clearly see the flexible pipe, slightly going upwards. This is for maximum ground clearance. |
 | p1030094.jpg (600 x 800) 28-12-2005 - Because it's so nice, another view from the front... :-) |
 | p1030095.jpg (800 x 600) 28-12-2005 - A view from the top. I made this photo so you can see the slight bends from the front up to the first damper (outside the photo). Unfortunately, it just doesn't really show... |
 | p1030096.jpg (800 x 600) 28-12-2005 - Another close up. |
 | p1030098.jpg (800 x 600) 28-12-2005 - Exhaust tilted side-ways for 90 degrees. You can see the angle of the flexible pipe, the short bend after it and the pipe going upwards directly following the short bend. |